Posts

And with the Push of a Simple Button...

Image
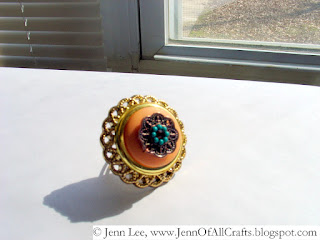
Hello and welcome!  My name is Jenn and I have been meaning to start a craft blog for a while now .  Since today kicks off National Craft Month, it seem s fitting to debut today and with the project that kicked my crafting into high gear: a button ring.   This is both my first button ring and my first full jewelry piece! If you're not familiar with the button ring , it's exactly as its name implies - a ring made by layering a series of buttons.   I t's just a matter of finding the right combination of sizes, colors, and textures.   Th is ring was inspired by a boho blend bracelet that a friend gave me for Christmas last year.  The style and most of the colors are relatively new additions to my wardrobe, so the bracelet was both a welcomed gift and an intriguing challenge. Button rings are usually finished with a wire knot  center, but I used a copper and teal jewelry connector as a centerpiece so the ring could hold its own against such...

Now THAT'S a Wrap!

Image
I didn't get to wrap nearly enough holiday gifts this year, so I was thrilled to be put in charge of wrapping a group gift for a friend.  When they dropped it off though, I realized that it was pretty large and boxy.  Because I'm me... just standard wrap and a bow wasn't going to do.   I used ornaments to accent holiday gifts this year and it was well-received, so I decided to continue the trend.  Luckily, I found the perfect sized long-length decor.             

The Secret Santa Double-Blind

Image
My friend at school came up with a fun idea for Secret Santa.  Instead of names, we jotted down our student ID numbers; so, not only do I not know who my Secret Santa is... I also don't know who will be receiving my gift!  Of course, having a mystery recipient made shopping a challenge, so I decided to make my Secret Santa gift. I  started with the group photo we took just after we picked our Secret Santa IDs.   I was planning to cut out the classmates who photobombed us, but I decided to put it to work instead.   It's probably not visible here, but  I mounted just my group members onto foam board to add layers to the photo.   And I noticed that the  restaurant's window  wreath was partly visible in the background of the photo, so I glued a fuzzy wreath embellishment over it.  And,  I wanted a tree that was a brighter shade of green, but the craft stores had a limited selection by the time I thought up this project, so in...

Blue Christmas

Image
Feeling down this holiday season after a brutal round of final exams, so I'm in my craft corner, trying to craft my Christmas blues away.  Always great therapy.  Stay tuned!

Bling up for Bid

Image
I just donated these pieces to an upcoming Silent A rt Auction to benefit the Touro COM chapter of S AAO (the Student America n Association of Osteopathy), a grou p dedicated to providing free osteopathic manipulative therapy to the community as well as to providing education resources for osteopathic medical studen t s.  I'm really e xcited to be able to cra ft for a cause and especially a cause of my future profession ! * To learn mor e about osteopathic medi cine, visit: http://doctorsthatdo.org/difference And i f you find yourself in the Middletown area this weekend, join us for a great night!

See one, Do one, Teach one

Image
I was honored to be invited by my school 's Creative Arts in Medicine club to host a jewelry making station at their Jammin' Arts Night.  Of all my creations , I'm always proudest of the things that I make comp letely from scratch, so I decided to teach caged-pearl bracelet making.  In retrospect, I probably should have picked an easier project to teach t o 1st time jewelry makers, but it made me all the more proud when the ladies stuck with it and got t o take home bracelets that they made themselves from start to f inish with their own two hands.  Thank you, ladies, for being the highlight of m y first time teaching jewelry making!

Spooky Lolli's

Image
Even though I 'm not a big Halloween fan, I have to admit that it ranks up there as one of the most craft-able holidays.   Th ese spooky lollipop s are a go -to favorite of mine because they're super easy to make and th ey 're enjo yed by kids and adults alike. You ca n experi ment with vario us fa brics.  W hen I didn 't live near a fabric store, I succes sfully used layers of gauze from the drug store .  I used linen f or the o nes pictured here .  Burlap can also work, if you want a fall fabric.   C ut your fabric into squares that are almost twice as lo ng as the lolli pop down to the stem .  Cover the lollipop and bunch at the base, tie with ribbon, and add googly eyes .  You can substitute orange or patterned ribbon for a more festive touch or even simply twist tie with pipe clea ner if you're super pressed fo r time . I gave these o ut at work a few years ago and one of my cow orkers pinned the wrapping after eating the lollipop,...

Rainbow Uncaged

Image
I love caged pearl bracel ets because they're beautifully intricate in appearance a nd yet so simple to make .  S tepping out of t he monochromatic scheme , I created this bracel et in solidarity of the LGBT community.  

Never Too Young

Image
G ifts don't have to cost an inordinate amount of money and handma de gifts don't have to be intricate .  In fact, I find that the best gifts come from simple concepts that are just perfect for the occasion . As I've mentioned, I am a mem ber of my l ocal chapter of K iwanis International, a global community service organization that has clubs for just about every age group .   A friend of mine often jokes that no one is too young to be part of the K-family, even embryos.  So, when I learned that the first of our club was expecting his first chi ld, I used it as an opportunity to bring that concept into tangible fruition. Our club had just finished decorating onesies for the NY District First Lady's Proje ct, Warm Beginnings, which aims to send every n ew mother home with baby clothes .  I bought an extra and borrowed the fabric ma rke rs to create this personalized onesie . We all had a good laugh and the gift was a hit - a simple concept that...

And in This Cage...

Image
I realize it's been a few weeks since my last post.  I've actually done quite a bit of crafting in that time, so I'm excited to finally start sharing them here, starting with: 2 styles of cage bracelets! I actually took a class at my local A.C. Moore to learn how to make these.  The one on the right is the one I learned in class: a classic caged-bead bracelet, made with iridescent crystal beads. I usually reverse engineer a lot of things, but I am really glad I took a class for this because it turns out that there is quite a bit of trial and error involved in the sizing; it's not just about the size of the bead and jump rings, but also about the wire gauge.  It turned out that the jump rings I bought were too small and thick and it  was really helpful to be able to test the sizing with the instructor's stock stash before exchanging . This was so much fun that I had to start another one.  That's the one you see on the left: a caged-pearl bracelet variat...

Courtesy of my 1st Sewing Machine

Image
I learned to sew by clumsil y following along with my mother as she mended cloth es when I was all of around 5 y ea rs old .  My sewing im proved with age (and the fin e motor skills that come with it ) , but it was extremely time consuming and then just plain limiting , as I started looking at bigger projects . Researching sewing machines was overwhelming though... ladies in the store scoffed bec ause I had never used one before and didn't know what to look for.  I wouldn't have minded , except sewing machines have become so technologically advanced that I honestly think it's eas ier choosing a smartphone.   M y best friend took matters into her own hands a nd bought me a sim ple small starter sewing machine for Chris tmas last year.  In figuring out how to use it, I created this pink tropical print dress in time for my vacation in Toront o!    So , with my 1st sewing machine at the age of 32, i t's finally the start of a whole new chapter ...